Photoshop. Simplified.
Lesson #six
Photoshop Tools
photoshop Selection Tools
A selection isolates one or more parts of an image. By specifying selected areas, you can adjust and add filters or effects to portions of your image while leaving the unselected areas unchanged. A selected area will be denoted by having "marching ants" around it.
Tools to create selections are located in Photoshop's Tools Panel. The easiest way to select pixels in your image is to use the Quick Selection Tools. You simply click an area and Photoshop will select similar areas.
Marquee Tools or Lasso Tools allow you to make a selection by tracing an section of your image. The most effective way to create a selection is with the Quick Mask Tool. Using these selection methods is covered in this lesson's video.
There are commands under Select in Photoshop's Menu Panel to select, deselect, or reselect all pixels. You can also refine your selection by clicking Select and Mask in the Tool Options Panel.
Replacing Pixels
Removing unwanted objects in your images is easy with Photoshop. As with all other tasks there are several ways to replace pixels in your images including the Spot Healing Brush, Healing Brush, Clone Stamp, and Patch Tool.
I will cover the two most effective tools ways here.
Option One
Select the Spot Healing Brush
Duplicate the background layer by pressing CTRL+J
(Command +J on MAC)
On the duplicate layer, use the Spot Healing Brush Tool to brush over the area to be removed. Photoshop will then automatically replace pixels with ones it thinks best suits the area you want to remove.
Option Two
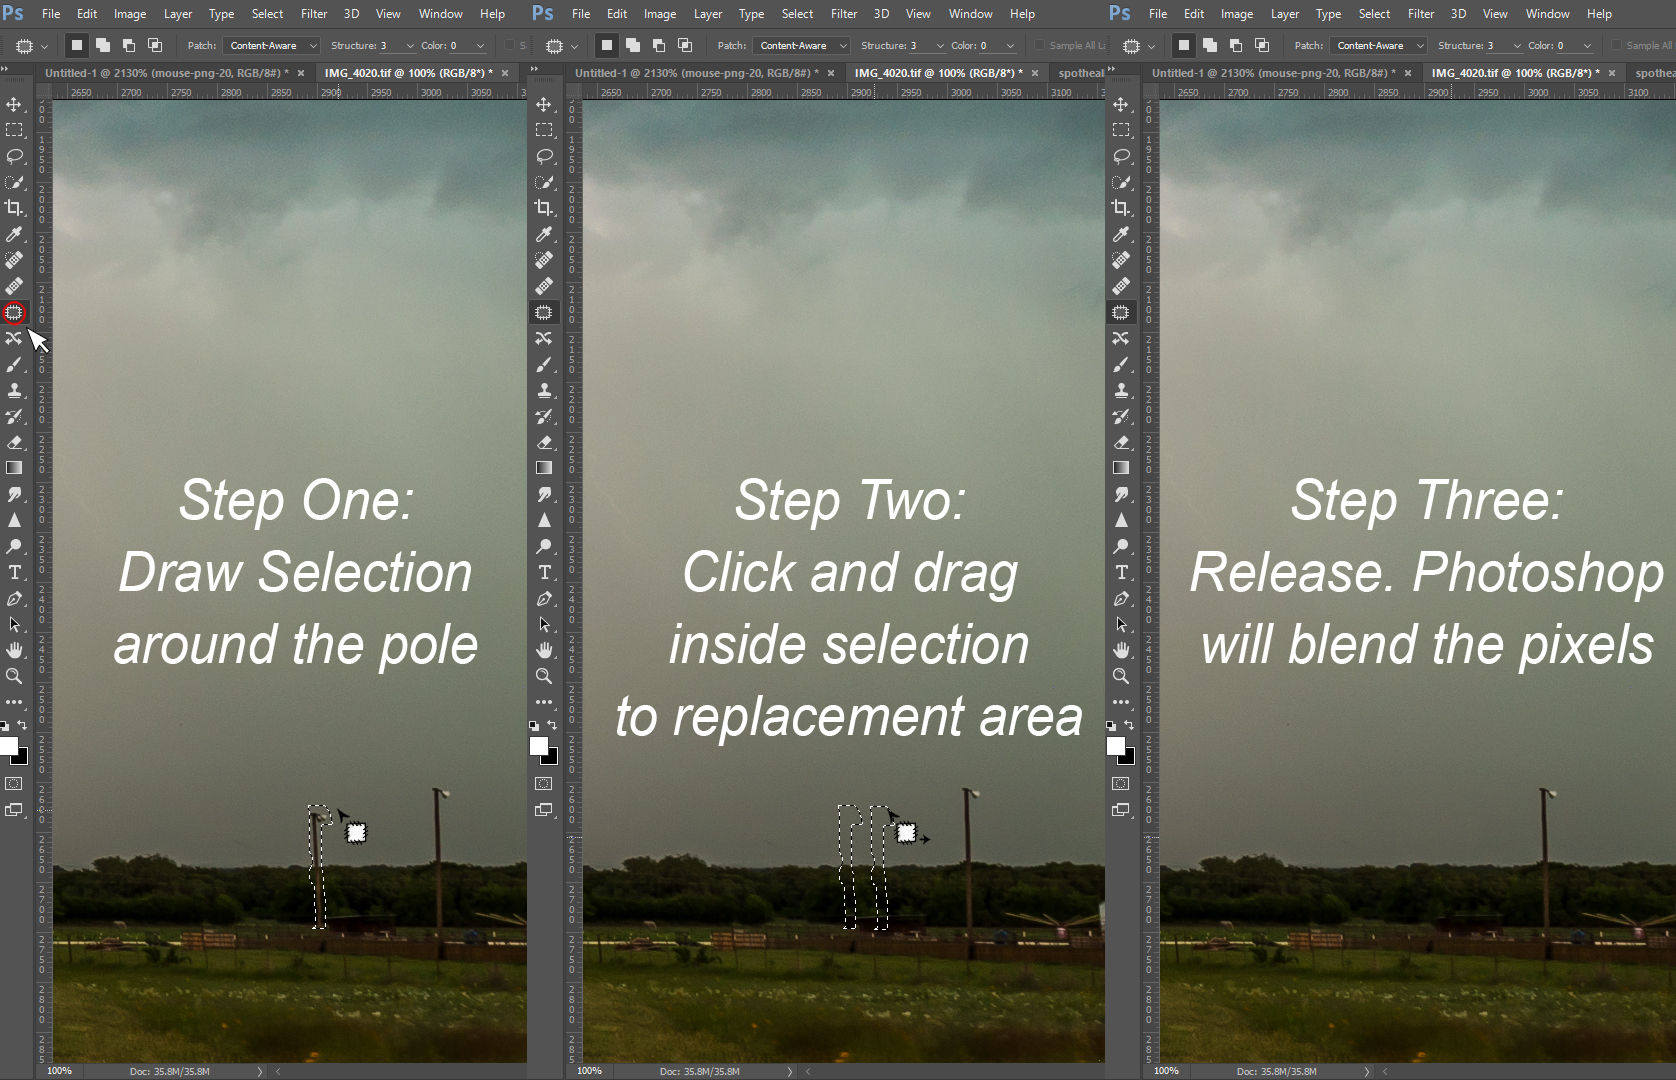
Select the Patch Tool.
Draw a selection around the object you wish to remove. Hover inside the selection with the Patch Tool then click and drag the undesired area to a different part of the image you would like to replace it with.
You will see the pixels inside the selection changing to the associated area you are dragging to,
When you find an area that suits you, release. Photoshop will replace the unwanted pixels and blend the new pixels together with the pixels surrounding the selection.
Tip : Occasionally Photoshop struggles with object removal it may take a combination of using the Spot Healing Brush and the Patch Tool to complete the task. In a worst case scenario, duplicate your background layer. Then draw a selection with the Lasso Tool around a section of the duplicated layer with similar size and consistency to cover the unwanted area. Duplicate the selection by using the keyboard shortcut (Ctrl+J). Then use the Move Tool to move the duplicated selection over the undesired part of the image. Merge the selection with your duplicate background layer, then use the Patch Tool and/or the Spot Healing Brush to blend the edges.
Dodge Tool and Burn Tool
When viewing an image the eye perceives bright areas as "moving forward" and dark areas as "receding". We dodge and burn images to add depth and dimension to them.
The Dodge Tool and Burn Tool come from the darkroom era. When printing images on an enlarger, photographers would use a dodging tool (basically a piece of cardboard on a stick) to block the light from hitting part of the paper. This would lighten that part of the image. To darken part of an image, they would use a burning tool (piece of cardboard with a hole cut in it), to allow more light to fall on a certain part of their print. Ansel Adams was a master of this technique.
Photoshop gives us these tools with much greater control. Each works in a similar manner to the Brush Tool, just with ability to change the brightness of a range of tones. With the Dodge Tool or Burn Tool selected, you can choose which range of tones you would like to effect (shadows, midtones, or highlights) in the Tool Options Panel.
For example, if I wanted to darken the brightest parts of my image, I would "burn" the highlights. If I wanted to brighten the darkest parts of my image, I would "dodge" the shadows.
You can control the strength of both tools by setting the "Exposure" level in the Tool Options Panel. The higher the exposure value, the greater the effect.
Duplicate the Background Layer by using the keyboard shortcut Ctrl+J (Command+J on Mac). Double click on the name Layer 1 and rename it Dodge.
Select the Dodge Tool.
In the Tool Options Panel
Choose the Range : Highlights.
Set the Exposure to 20%.
Right click on the image with the Dodge Tool. This will reveal the Dodge Tool's Brush Options Panel.
Set the Size to 500 px and the Hardness to 0%.
Use the Dodge Tool to brush around on the brighter parts of the clouds. Don't worry about it having too much effect. This is so we can better see what exactly the tool is doing.
Turn down the Opacity of Layer Dodge to 50% to make the effect more realistic.
Control the Dodge Tool and Burn Tool in the Tool Options Panel.
Select the Background Layer. Duplicate it by using the keyboard shortcut Ctrl+J (Command+J on Mac). Double click on the name Layer 1 and rename it Burn.
Switch to the Burn Tool.
Choose the Range : Shadows.
Set the Exposure to 15%.
Right click on the image with the Burn Tool. This will reveal the Burn Tool's Brush Options Panel.
Set the Size to 500 px and the Hardness to 0%.
Use the Burn Tool to brush around on the darker parts of the clouds.
Turn down the Opacity on Layer Burn to 50%.
Sponge Tool
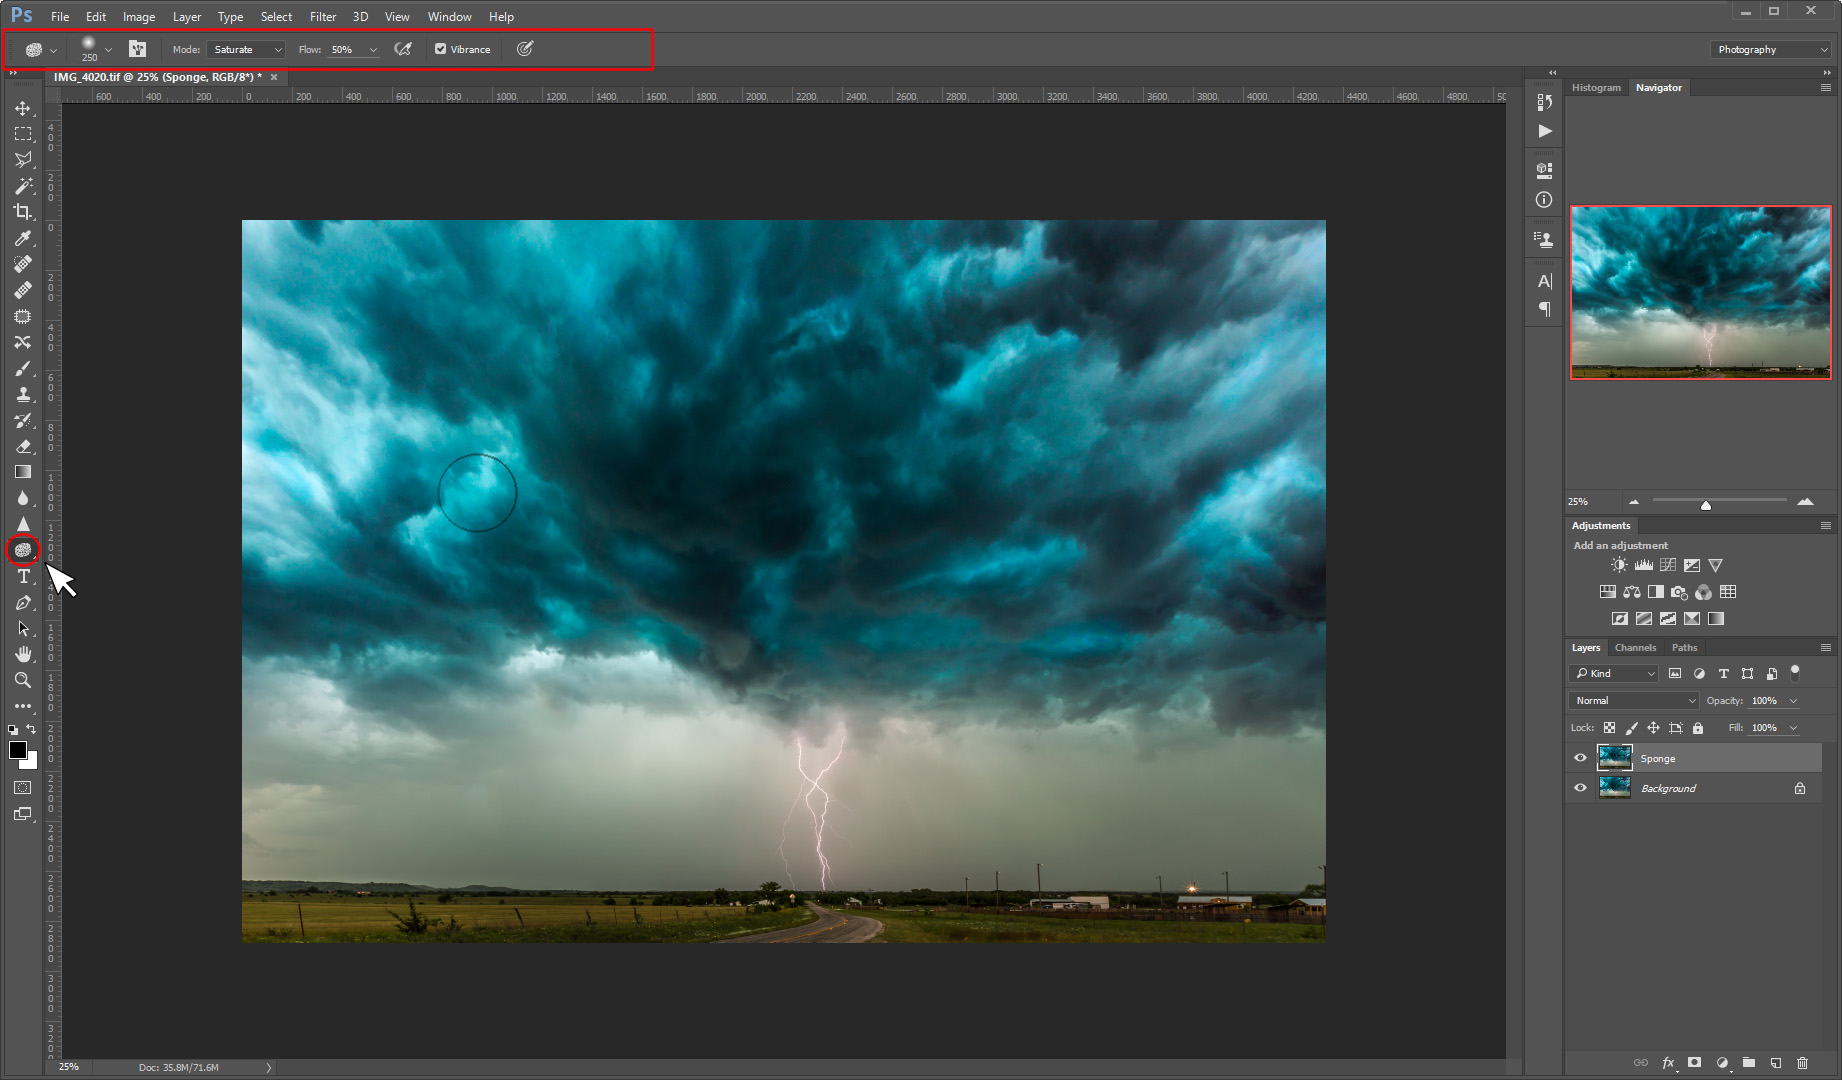
Control the Sponge Tool in the Tool Options Panel.
The Sponge Tool is a great way to saturate or desaturate certain parts of an image. It works in a similar manner to the Dodge Tool and Burn Tool, except it saturates or desaturates instead brightening or darkening.
Select the Background Layer. Duplicate it by using the keyboard shortcut Ctrl+J (Command+J on Mac). Double click on the name Layer 1 and rename it Sponge.
Select the Sponge Tool.
Set the Mode to Saturate.
Set the Flow to 50%.
Right click on the image with the Sponge Tool. This will reveal the Sponge Tool's Brush Options Panel.
Set the Size to 250px and the Hardness to 0%.
Use the Sponge Tool to brush around on the greenish-blue parts of the clouds.
Turn down the Opacity on Layer Sponge to 50%.
YOUR ASSIGNMENT
You are one of the select few that knows everything about selections! Perform each of the actions in the text lesson to an image. Save it as a jpeg. Then email the file to Jason@JasonRWeingart.com.
Got a question? Ask Jason using the form below.


